Open Source House
Training course for Solar Village
Add your voice, ideas and thoughts to the development of the Solar Village Open Source House - email: john.wilson@thesolarvillage.com with your updates and under which section, item number or paragraph they apply.
Goals
- local materials that are renewable
- affordable for anyone
- easy enough for anyone
- entirely powered by renewable energy
- comfortable in a wide variety of climates
Requirements
- two bedrooms
- one bathroom
- kitchen
- living room
Features
- passive solar heating/cooling
- straw (or similar) bale (or similar) insulation
- greenhouse for some food production
- green roof
- rain water collection and use
- composting systems waste recycling
- solar photo voltaic electricity generation
- 100% recyclable batteries for off-the-grid energy storage
Straw Bale Construction, Home and Business
First of all, you need to get comfortable with the idea of building with straw. I know when I first heard about the concept I was exceptionally skeptical despite a strong desire to build sustainably. My gut instinct told me that perhaps it would rot or catch on fire too easily. I have a family, and despite my strong desire to create a sustainable future for my children, it would not be worth taking additional risks. So I began to read every book I could find on the subject.
Surely the three little pigs taught us that straw was not the right material to use. It would just blow away, rot or burn…wouldn’t it?
Is straw bale strong enough? Yes, in fact it’s stronger than most other building techniques since it has some “give”. Rather than crumbling in an earthquake, for instance, the system, like a tree, is able to dampen the shock, bend, while not being rigid and crumbling. It won’t blow away because the simple construction system sews the bales into place, weaving natural fibers together with steel wire fencing, and rock solid posts and beams. In fact these homes have proven capable of lasting almost a hundred years even in difficult climates like Nebraska. Even in the humid southern state of Alabama, a large straw bale mansion has withstood the test of time since the fifties.
Also keep in mind that straw bale and straw/mud homes are still built and used all over the world. They are a sensible design that has evolved over thousands of years of trial and error. Although we may be less familiar with the comfort, safety and longevity of these wonderful homes, people all over the world are building with straw bales, relearning ancient techniques and combining them with modern tools, materials and designs. As my wife Leigh says, keep an open mind.
So what is so great about straw bale? Where to start? There are so many things about building with straw bale that I’ve learned and that have convinced me that it is one of the most sensible, cost effective and sustainable systems ever to have evolved. The benefits also exist at all levels from design flexibility, ease of construction, health, safety and sustainability.
First of all, straw is in general an inexpensive, renewable building/insulation material available in pretty much all parts of the world in one form or another. Being a local and renewable building material that is inexpensive makes it worth a good hard look. There are different types of straw such as wheat-based or rice-based. Similar to straw is hemp, another potential renewable building/ insulation material. Cob is another farm product that can be used to build in a similar way. The beauty of these materials is that they grow back each year so we aren’t cutting down old growth forests or using up large amounts of fossil fuel based energy supplies to create conventional insulation materials like fiber glass or “Roxul” (volcanic rock with steel slag). Also, the cost of straw insulation is less than commercial insulation materials while the insulation values are better.
The other critical benefit of straw bale walls is their ability the “breathe”. This ability, despite superior insulation levels, provides improved air quality. You’ve no doubt heard about “sick building” syndrome. You’re probably aware of the molds, mildews and fungus growing in homes. Well, incorporating breathing walls can prevent all of this. Breathing walls also react to changes in climate much better than modern methods of sealing a home and then trying to mechanically ventilate it, not to mention the additional energy costs to do so.
Just imagine our modern homes, R2000, or conventional housing development homes built to Canadian “standards”. These home are essentially sealed up in plastic and then a heat recovery ventilator (HRV) tries to mechanically refresh the air from the outdoors at a specific rate.
Unfortunately these systems don’t work that well. In most such sealed homes there is a very real and common problem of molds, mildews and fungus growing in your walls. This is most frequently caused by the condensation of water on the inside of the vapor barriers, mandated by R2000 or general building codes. So the sealed home works well in the winter by insulating and preventing air from blowing into the home. However, this design does not react well to warm humid summers. Instead, in the summer especially, these conventional homes will be susceptible to condensation. Combined with air conditioning and forced air type heating systems, these homes are like sealed bottles of toxic chemicals.
Problems?
Okay then, but doesn’t it cost more? Actually no. Straw bale construction probably costs about the same as conventional construction techniques, although it could cost a fair bit less if you did the work entirely yourself or with volunteers. Over the long run, however, the superior insulation levels provided by straw bale will save you money in reduced heating/cooling costs. Depending on the source of your straw, the cost may be significantly less that conventional insulation. As the cost of energy goes up, so will the cost of conventional insulation, which requires relatively large amounts of energy to produce.
Some of the other major concerns people have include:
- Fire – Tests have proven that the straw bales don’t burn; instead they may smolder a little but make actual flames unlikely, and certainly less likely to burn than convention 2x4 framed stud walls. The three layers of stucco, and the borax sprayed on the bales before the stucco is applied, all work to prevent even the possibility of fires. Also, the lack of spaces for air makes the spread of fire less likely. During construction is the only time that fire should be a major concern. Since the straw bales will be divided, trimmed, slice and diced, the loose straw that blows around the construction site becomes a fire hazard if not cleaned up regularly. Take special care to make sure people aren’t smoking or burning anywhere near the work site. Also, it is critical that you maintain a work site clear of loose straw to minimize this danger.
- Pests – Again the compressed nature of straw bales, lack of anything worth eating, and lack of moisture makes poor homes for pests. In general, the vast majority of experience with straw bale has proven it to be less susceptible to rodents, bugs or other pests, partly because of the three layers of stucco, tight sealing and again the compact nature of the straw bales.
- Building Codes – Most countries actually support straw bale construction in some form or another. The United States, and certain states in particular, have support including fire code testing. In Canada, the six thousand square foot straw bale home we worked on in the city of Mississauga (near Toronto), went to the building code committee for review. This review took about a year but has resulted in a very clear ruling in support of straw bales. The ruling required that the architects and engineers involved in the project back up claims that this natural fiber insulating material met the building codes principles for quality construction standards, including susceptibility to fire, strength and other building criteria. Keep in mind that you still may need to relate to your local building inspectors these cases and even some of the technical back ground of this system in order to get them on board.
 The other thing you learn about straw bale is that two design types are possible. Actually there are perhaps hundreds of different ways or variations on these techniques, but in general, there are two popular techniques. First, you can build using post and beam construction techniques familiar to many builders and very common all over the world. In this configuration the straw bales are primarily for insulation although the walls themselves are substantially stronger than conventional walls. The second design technique is a “load bearing” straw bale design. This system does use the incredible strength of the straw, compressed, to actually bear the weight of the roof.
Most building codes now support post and beam based (non load bearing) straw bale construction. Some areas also support load bearing straw bale (for instance in Quebec, Canada). Always make sure to check with local building codes before getting too far down the path with straw bale.
You might be thinking, won’t that straw just rot when it gets wet? Sure, if you leave it soaking in water it will eventually. However, a key part of straw bale design is allowing the straw to stay dry. A roof with extensive overhangs to prevent water from reaching the walls accomplishes this.
This article focuses on the basics of a post and beam technique for straw bale construction. For details on post and beam or load bearing straw bale construction consult one of the many excellent books on the subject, for example, Straw Bale Building by Chris Magwood and Peter Mack.
Planning and Design
The general layout of your structure can essentially follow conventional rules for post and beam construction. For simple structures it is easy to draw up plans yourself. Drawings should include the site layout so that you can determine placement of windows, posts, bales, doors, stairs and other important features of your structure. Knowing in advance where everything is going and where you are going to place everything is critical. Without this you will no doubt build things that need to get reworked because you forgot to consider requirements of this feature. If you are planning a larger, more complex structure, home, workshop, community center or multi-story building you should work with an experienced architect. There are not many architects who are familiar with straw bale construction. One of the best in the world is Martin Liefhebber, who designed our home. For large, complex structures, it is essential to get an expert at eco-design. For a simple home, or once you’ve consulted with an architect, you may be able to manage the final design and construction yourself.
The basic design technique follows the principles of post and beam design. The straw bales essentially act as an insulation material and the stucco provides a flexible, strong, and “breathing” wall. Some key design elements to make sure you include for straw bale insulation include:
-
Plates (or curb on top of the foundation): Approximately 18” (this is completely dependent upon the straw bales you get…so find out your source for these and make sure you know their average dimensions) top and bottom plates on which to place and secure the straw bale.
 Bottom Plate (or curb): Use 2x4’s nailed or glued to the floor. Fill in the area between each side of the 2x4 platform with about 2” thick insulating Styrofoam that matches the thickness of the 2x4. This ensures that the high insulation levels are maintained at the bottom of the bale walls. The 2x4’s curb provides a base on which the bales can be placed and a surface for stapling the chicken wire to each side of the wall at the bottom.
 Top Plate: Cut a .5” to .75” plywood to provide a top plate towards which the bales will be stacked. This top plate should butt up against the ceiling/roof structure. It should be the same width as the base plate.
 - Keep in mind that the walls will vary in thickness and have typically rounded corners.
- Wall thickness can be varied by placing the bales on end, rather than flat, so that the thickness of the walls can be reduced by approximately 3” to 6”. Of course the insulation levels will be reduced as well but for a shed or other structure that does not require as much insulation this may give you the additional inside floor space you want.
- The additional layers of chicken wire and two to three layers of stucco on both sides will add to the final thickness of the walls. Plan for an additional inch or two on each side. In other words about twenty inch wide walls rather than seven or eight for conventional walls. Keep in mind that your walls will insulate at levels of R30-50 as compared to around R11 for conventionally insulated walls, so this extra thickness really pays off.
Ordering Materials
With designs completed you will need to get a building permit for anything larger than a shed. Check your local building code for permit requirements. Certainly on a larger structure like a barn, workshop, cottage, home or condo you’ll need to ensure that your design is acceptable to the building department. In most places in the world, straw bale home construction has been approved, so this step should not be difficult. If concerns are raised there are many sources of information that you can provide to support your request to build with straw bales. In the case of a home in a suburb of Toronto, near where I live, the owners had to go to the building committee with engineers in order to get permission to build with straw bales. Their successful review puts their case in the building codebooks as a precedent. By referring to precedents like this – where engineers backed up claims that straw bale does provide a good building/insulation material, meets fire codes, provides proven levels of insulation, supports structure code requirements and will stand the test of time – you are treading on solid ground. It is possible that in your area you may need to be the ones to break down barriers. However, that process is becoming easier as more and more cases such as this are won.
Now that your building plans have been approved and you are comfortable with all the details having been determined, you are ready to place your orders for materials. With the dimensions of your floor space and walls determined, you will be able to calculate your required quantities of materials. Keep in mind that with straw bale you should order 10-20% more bales than you think are required to ensure that you don’t run out during construction. You will likely want to order the foundation, framework and roofing materials first, and complete that work before taking delivery of the straw bales. Once you have completed this stage you can take delivery of the bales and store them in the covered structure or under a waterproof tarp. It is important to keep the bales as dry as possible throughout the construction process and until they are covered with stucco.
Materials List (Straw Bale Walls)
- Chicken wire fencing rolls
- Wire mesh for window/door corners
- Stucco paper for around windows/doors
- Portland cement bags
- Vapor barrier
- Tar paper (to isolate straw bales from foundation)
- Lime bags
- Wire of similar type and gauge as chicken wire
- Straw bales
- Staples
- Nails
Tools Required
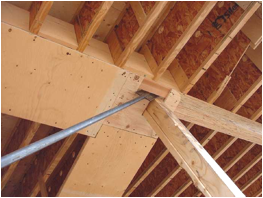
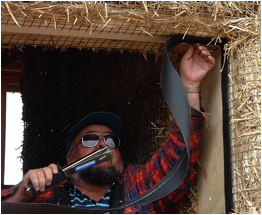
 In the picture you can see some of the essential tools required for straw bale construction. On the right are some wire ties for connecting the chicken wire pieces together along with a hook twisting tool. Wire and the steel rods that act as needles are in the middle (sewing rods can be made from rods available from your local hardware store, they should be about two feet long, drill a hole in the tip thick enough to be able to put the binder twine through, and use a hack saw to create a pointy end on the end of the rod). Trowels for applying the stucco are see in the upper right. As well, you can see some binder twine on the right.
- Stapler (ideally air powered)
- Hammers
- Large wooden mallet
- Trowels
- Buckets
- Wheelbarrows
- Cement mixer
- Sewing needles (straw bale)
- Wire cutters
- Power tools (drill, circular saw etc.)
- Chain saw (to trim the bails)
Before you organize a group of volunteers to do the straw bale walls make sure you complete the preparation of all plates around the perimeter of the structure, top and bottom. For both our home and shed we used 2x4’s to frame the based, with 2” blue Styrofoam insulation cut to size between the 2x4’s. This creates a perfect platform on which to stack the bales and tack the chicken wire to each side of the wall. The top plate can be cut from plywood to size and tacked securely to the upper beams supporting the roof or between the posts. This top plate needs to be secure as the forces to be placed on it by the wall and adjustments with a wooden mallet will be significant. As well, the long-term viability of the wall may be compromised if it is not well secured.
Construction
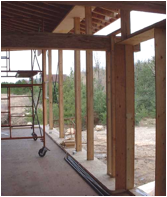
Once you have your materials, you need to complete all of the foundation, framing, posts and beams. In most cases it is best to also complete the roof so that you have a covered area to store the bales and so that the bales will be covered once the walls are completed. Keeping bales dry is important to ensuring their long-term viability. If they get wet without drying properly they will eventually begin to rot. Straw bales should have less than 20% humidity. Devices are available to measure levels of humidity within the bales. In general, as long as you and the farmer have kept the bales from getting soaked by rain the bale should be sufficiently dry for use in your project.
Each door and window should be framed with 2x6 or 2x8 lumber “bucks” for placement within the bale wall at the right levels. The doorframe can be secured before bale stacking begins. Once all of the framework, posts, beams and frames are ready, and all materials for construction of the bale walls ready, the construction of the walls can begin.
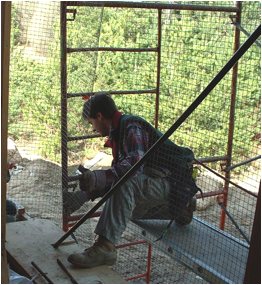 It may be easier to staple the chicken wire fencing (usual supplied in rolls) to the outside plates before starting the bale stacking (see photo left). Cut the chicken wire with wire cutters so that it can be attached to the top, then bottom plate. Staple the top and then the bottom of the chicken wire strips. Leave openings in the chicken wire for doors and windows allowing sufficient wire to wrap around to the frames. As each strip of chicken wire is added, overlap with the previous section by about an inch. Then sew the two strips together with steel wire.
Corners and edges that are exposed to the outside side of the walls should be lined with a plastic membrane (vapor barrier). These should never be used throughout – only where the stucco will eventually make contact with the posts, beams, windows and doors. This will deter moisture from leaking through the walls and into the home at these edges. It is important that any moisture that does penetrate the wall eventually be able to evaporate and flow away from the wall. Make sure these small areas of vapour barrier do not have any cups that might trap water.
Laying the Straw Bale Wall
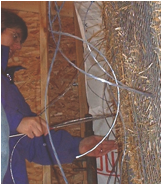
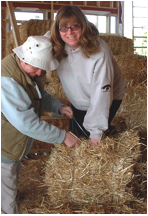 Now that you are ready to stack the bales it is important to have prepared some odd sized bales for corners and ends. Have a group of people prepare one third and two third bales by cutting the baling twine and re-tying the two parts. This turns whole bales into pairs of one-third and two-thirds bales. Make as many of these as you think may be required for the number of ends and corners in your structure (see pictures below).
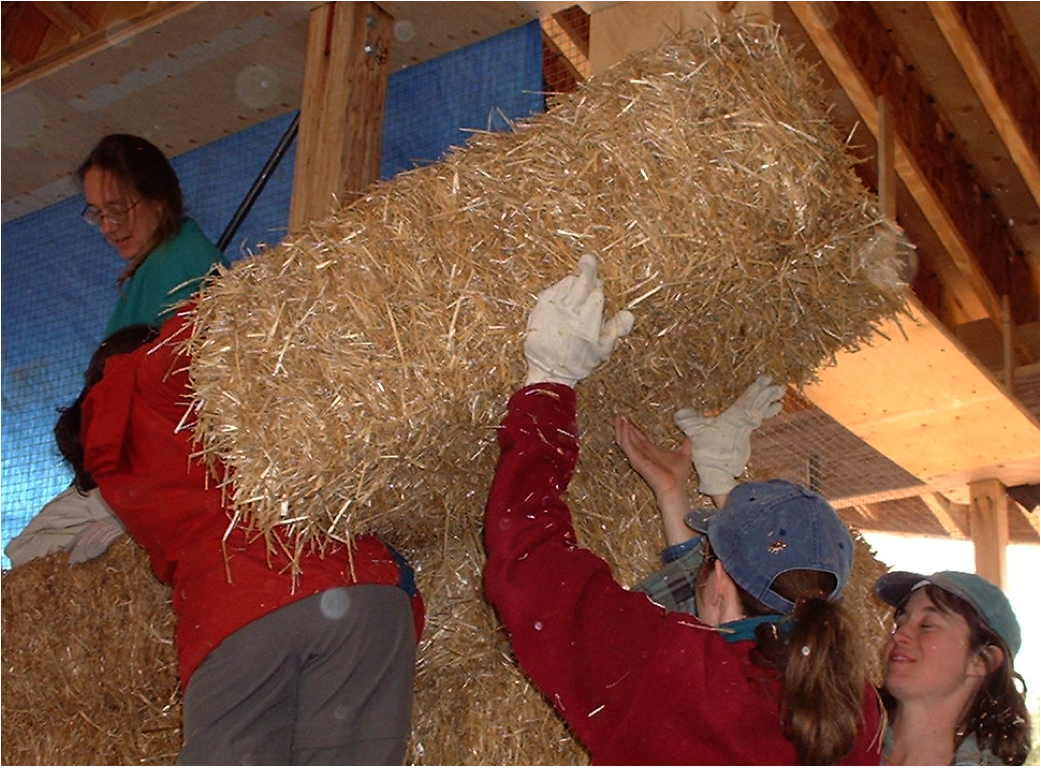
 Lay the straw bales one layer at a time. Complete the first layer, stuff any unusual gaps with loose straw against the chicken wire to ensure no gaps exist. This is critical to ensuring a consistent level of insulation throughout the entire wall. Any gaps or air pockets will severely affect the insulation capacity of the walls. Don’t leave any gaps between the bales. Once each row is properly filled you can begin the next row. Offset the next row by half a bale, just as a bricklayer would offset the bricks with each row. This ensures a stronger wall. With each row, ensure no gaps or cracks exist. Fill these with loose straw before continuing to the next level.
As you stack bales around doors, windows and corner it may be necessary to insert one-third and two-thirds bales to ensure a good tight fit. Watch for bulges or bales stacked the wrong way as these will create areas of weakness, less insulation levels and unusual shapes. Keep in mind that it is possible to create and place artwork, shelves, tables and larger than normal window sills, stools, storage spaces and much more. Use your imagination with care though, as some ideas may not be what you want for the long term and changing things can be difficult.
While stacking the first layer, the electrical outlet boxes should be attached to a piece of 2x8 lumber and laid on the bales before stacking the next layer. All electrical and plumbing work should have been planned well in advance and prepared so that it can go in, around or under the bales effectively.
Chicken Wire
Once all of the rows of bales are stacked, cracks filled and corners checked for gaps, it is time to staple the chicken wire fencing to the other side of the bales. Once again, cut the chicken wire fencing to fit the space from the top to the bottom of the wall. Cut to size with wire cutters, staple to the top plate, and then staple securely and tightly to the bottom plate. As each strip of chicken wire is added, overlap with the previous section by about an inch. Then sew the two strips together with steel wire. Special wire twists that can be used to secure the two pieces together quickly with a special hook tool are also available.
If there are any wire bulges, you may want to create some wire “staples”. Cut about twelve inches of wire and bend in the shape of a “U” or “V”. These can then be inserted into the bales to secure the chicken wire to the bales.
For windows ledges, sills, and doors, attach a finer steel mesh to create curved or sharp corners from the buck frame to the main wall. This additional steel mesh adds strength to these areas that will be impacted by people and objects as these areas are used frequently. Tar paper can also be inserted around and below the chicken wire/wire mesh in corners.
Sewing
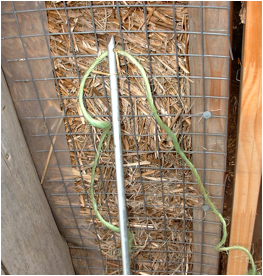 While the corners are being finished the walls can be sewn together from each side. Baling twine spools and some straw bale sewing needles will be required. We made our own sewing needles using some steel rods about a quarter inch thick and two feel long, purchased from our local hardware store. On one end of each rod, we created a pointed end by sawing off the corners at a forty-five degree angle. Finally we drilled a hole big enough for the baling twine to fit through (about a quarter inch or half a centimeter). Be very careful with these tools around children, and make everyone aware of the danger of poking someone during the sewing or preparation process.
 With tools prepared the sewing can begin. Sewing requires pairs of people to work on each side of the straw bale walls, after the bales have been stacked and the chicken wire secured on both sides as well as top and bottom. The sewing process starts by measuring about ten meters of twine and threading it through the nose of the sewing needle hole. The other end of the twine is then tied to the chicken wire at the bottom of the wall. The sewing needle is then pushed carefully through the bale so that the person on the other side can pull it through completely (being careful not to impale anyone!). The second person “zigs” over about eight to twelve inches and up two to four inches, and pushes the needle back through from the other side. After pushing the needle back through, pull the remaining twine through, ensuring that each stitch is pulled taught. This continues until the top of the wall is reached or until the twine runs out at which point it is tied off on the chicken wire.
Make sure that all of the chicken wire is pulled tight to the straw bales so that no gaps are left. The entire wall should stiffen up as more and more of the wall is stitched. Shifting over a foot or so, repeat the same process for the entire section of wall. Many pairs can work in parallel during this process in order to complete the job quickly – like a quilting bee! Make sure that holes and gaps are filled with straw around doors, windows and corners before sewing tight.
Preparing for Stucco
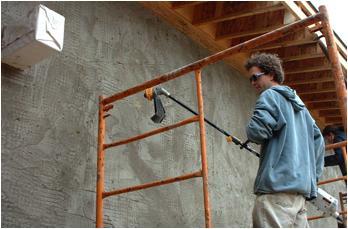
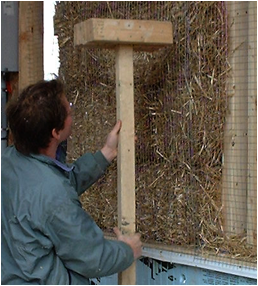 Use a large wooden mallet, like the hand-made model pictured below, to flatten and straighten the walls as desired. Make sure no gaps or weak spots exist. Trim all loose straw sticking out of the chicken wire with a “weed whacker”. Spray a borax/water solution on the bale walls as a fire retardant.
 Check to make sure that all corners are well prepared with additional stucco mesh formed to the desired shape. Remember that entranceways, windowsills, and corners need to be able to resist many impacts without cracking or breaking.
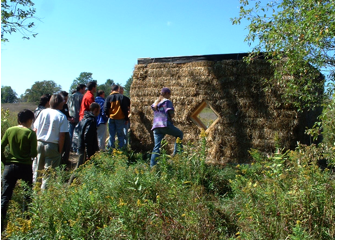
Depending upon the number of volunteers helping and the number and complexity of straw bale walls, this phase may take a full weekend to accomplish. In my own experience the two main phases, assuming a good number of volunteers (between ten and twenty people), the straw bale wall raising can be done through a single weekend. The stucco process usually then takes another weekend or two depending on weather and other factors.
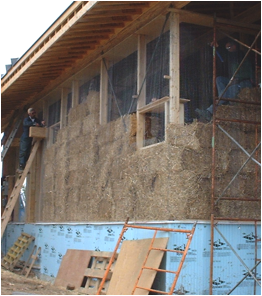
Stucco Plastering
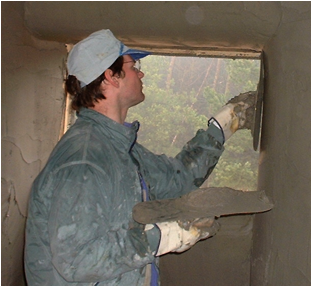 For larger jobs the major tasks in this phase of the construction should be specialized for different groups. One group should manage the plaster mixing while another does the stucco application to the walls. Each group needs to work in a coordinated manner so that as the stucco plaster is prepared it can be immediately applied to the walls. The first coat must dry to some extent before the next layer is applied. Also, the first rough coat may need substantially more stucco as this layer needs to fill all cracks and create an even surface. The first layer should also be scored with a rake before it dries. This scoring provides an important bonding surface for the next layer.
 Typically three layers are applied. The first layer should cover the entire surface of all walls and fill gaps. As it dries it should be scored with a rake. Any straw that sticks out should be clipped off at the first layer. Once the first layer dries a lighter layer should be applied to smooth out the entire surface. This may be used as the final surface. To make it a nice texture the second layer can be sponged with a wet sponge. This brings out the sand in the mixture created a smooth texture and minimizes lines created by trowelling.
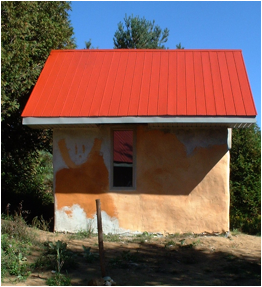
A final third layer may be applied in order to pigment the final wall. This allows color to be added.
In order to prepare large amounts of cement-based stucco, a cement mixer will be required. For the small shed that I built, I simply mixed the ingredients in my wheelbarrow. For larger homes, walls and buildings you will need a proper construction mixer. Building our home, we rented one for a weekend.
The plaster mix we used was one part Portland cement, one part lime and five parts sand. Mix in water until the consistency changes to a thick mud. You’ll know it is right once you try to apply it to the straw bale walls. In should stick and spread, maintaining its position and shape. Don’t add too much water too fast. If you do though, you can add the ingredients in the same proportion to thicken things up again.
Each layer should be applied completely before starting the next layer or breaking for the day, in order to ensure consistency. The stucco is typically applied using a stucco platter to hold the mix. Then the stucco can be spread evenly with smooth consistent strokes using a trowel. Corners can be rounded or forced to a square edge. You may need to spray some water on each layer of stucco as it
Greenroof 101
Home Made Green Roof
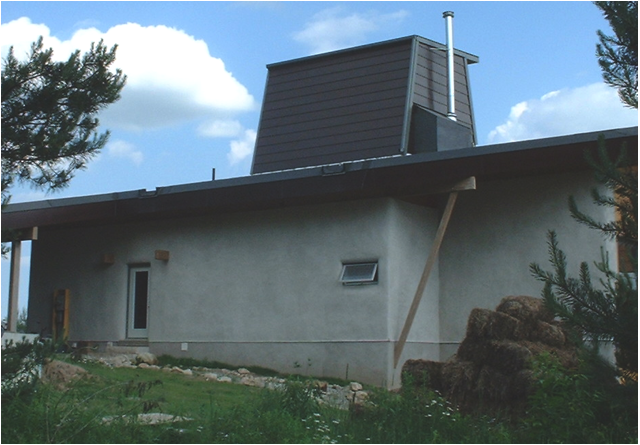
The green roof system reduces heating inside the home or building by up to 30-40% making it a natural air conditioner. Green roofs are found in 20% of the homes in Germany. Recently, the home made green roof system developed by John Wilson has been upgraded to include swales for water collection where we are starting to grow some herbs. If you are interested in more information about this green roof system, please contact john.wilson@thesolarvillage.com and join the Solar Village community online.
Greenroof 101 Video
Insulation
The award winning Wilson Natural Home above uses a green roof to both cool in the summer but also to improve insulation levels for improved warmth in the winter. The six inches of soil and several layers of membranes significantly increase the insulation levels in the roof which is a major contributer to heat loss.
Environment
The use of green roofing replaces soil that is displaced during construction. The return of native plants to the construction site returns the health of the local environment. Green roofs have been proven to significantly reduce the heating effect typical of homes, buildings, cities and towns caused by their dark roofing materials that absorb and then radiate heat into the local environment.

The basic design and construction of a green roof can be quite simple and inexpensive. Given the additional loads that a green roof requires engineering will be required to ensure the correct level of support structure. The basic design of a green roof is as follows:
- Plywood layer on top of roof trusses or joists (some slope is required for drainage, too much slope may be difficult to cultivate due to erosion).
- Apply a synthetic rubber membrane on top of the plywood roofing structure. Up to this point you have basically created a common industrial roof.
- In order to retain the soil the roof must provide a containing edge from four to eight inches high, also covered by synthetic rubber. Don't forget to leave some drainage scuppers.
- Once the base roof water proofing system is in place the additional green roof components can be added when ready.
- The first layer of the green roof is typically a foundation membrane (a dimpled "Delta" membrane or something similar that can catch and retain some water in the little cups.
- Add a landscaping root barrier membrane. Apply the all membranes from bottom to top and ensure layers overlap with upper (higher) layers on top of lower layers. (The same way you shingle a house).
- Around the drainage zones create a drainage area as you would around the foundations of a house, with gravel and drainage tubing.
- Fill in with soil from four to six inches.
- Use straw mats tucked under the soil to reduce erosion as the soil begins to grow plants in it.
Greenroof Diagram Drainage Details

More Videos
Building a Green Roof Part 1
Building a Green Roof Part 2 - Leak Detection
Building a Green Roof Part 3 - Layers
Building a Green Roof Part 4 - Planting an Extensive Greenroof
Building a Green Roof Part 5 - Planting a Semi-Intensive Green Roof
Inspiring Visuals of Real Examples
Greenroof 101 PDF Free Download
Greenroof 101 ePub Free Download
Environmental Design & Construction, Feature
Check out www.GreenRoofs.com for more information.
Please submit your open source ideas to add to our collection.